Sunday, October 25, 2015

Making Dialogue Punctuation Tactile


Texas TEKS Student Expectation for Fifth Grade


5.16.A.iii: Write imaginative stories that include dialogue that develop the story

The Challenge


It's difficult for my ELL's (English Language Learners) to fully grasp punctuation rules. We drop the inverted question marks and exclamation marks when they change languages, and so much of their cognitive power translating and functioning in a second language. (Something I feel equivalently anytime I step into a room of native Spanish speakers and I'm the only non-native speaker there.)

So, the challenge is that I want my fifth graders to be able to write imaginative, inventive stories, and dialogue, I know as a reader and a write, is massively important to creating engaging narrative, regardless of the level or age of the author.

The Process


Lesson 1:

Part I. I downloaded the declarative knowledge of what the word dialogue means and what it look like through abbreviate notes. (Also played a Brainpop video to one group for reinforcement)

Lesson 2

Part I: Brief verbal review of notes with emphasis on noticing punctuation marks.

Part II: Students copied examples of dialogue out on sentence strips. Then, I asked them to make a cut between the dialogue and the dialogue tag. After this, I asked them to cut off the comma, then the quotation marks, and finally the punctuation. I modeled with my own sentence how I could rearrange all the pieces to move the dialogue tag to the front almost like a magic trick. The students then tried to replicate the effect with their own manipulatives and I helped them. (Sometimes we had to make an extra comma or extra period, depending on the sentence.) Finally, students put their pieces into baggies and mixed the pieces up and challenged friends to reconstruct their sentences correct. For extra challenge, some cut the entire sentence into separate words as well. They loved the challenge.


Lesson 3

Part I: Whiteboards: Reviewed parts of dialogue and dialogue tags by showing sentences with no punctuation whatsoever and have students identify using the context only which part was dialogue and which part was tag. Whiteboards let me give immediate feedback.

Part II: Adding punctuation on whiteboards--students then started adding in correct punctuation on their own, but easily fixed with rapid teacher feedback.

Part III: Students used map colors to add in commas, question marks, exclamation marks, periods and quotation marks onto worksheets with prewritten dialogues.

Lesson 4: Scaffolded Dialogue Construction

We read part of an amazing wordless graphic novel by Shaun Tan called The Arrival.

Part I. The book is about an immigrant man passing through a surreal version of New York and adapting to life there.

Using whiteboards, we invented our own dialogue for the page, discussing and making inferences about what we think the characters might be talking about.

Again, using whiteboards at this point in the process helps me correct errors in the students' understanding of how to compose dialogue very, very quickly. This is very much "You do--I help" part of the guided release model.


Part II. Once students start so show proficiency, we moved to writing on notebook paper and practicing making correct indentations when we change characters. We also practiced the importance of paying attention to neatness and organization (skipping first line, pausing at the pink line and returning to the red line on standard notebook paper). We discussed as a class when we should or should not start new paragraphs.

If you don't own this book, it's totally worth having in your library. It does an amazing job of making you feel like an immigrant in a foreign country while using dream-like imagery to provoke deep questions and thoughts--all without a single word in the entire book.This was still guided work, but with less support.

The next step is for students to compose the next set of dialogue on their own! More to come!


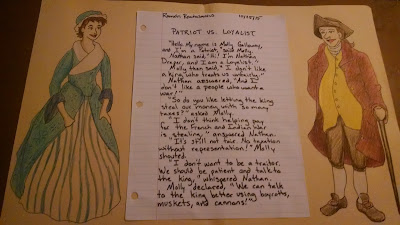
End Product Goal: Social Studies Integrated Project: Loyalist vs. Patriot Dialogues! [Coming soon!]



Subject/Predicate

D: What is a subject and a predicate?


  • A subject and a predicate are the two parts of every sentence.
  • The subject is who/what the sentence is about.
  • The predicate is what the subject is doing or describes them. 

P: How do I find subject and predicate?

  1. Ask, "Who or what is this sentence about?"
  2. Ask, "Where is the verb?"   
The subject is in green. The predict is in yellow.

Ramon eats.
Ramon eats nachos.
Ramon eats nachos too often and gets bellyaches.
Little dinosaur Ramon eats nachos.
Little dinosaur Ramon eats nachos too often and gets bellyaches.


C: Why do we use subject and predicate?

  • Because you need both pieces to have a complete thought.
  • Missing a subject or predicate makes a fragment.

Apostrophes


D: What is an apostrophe?

An apostrophe is a punctuation mark used to show:
  • ownership
  • contraction


P: How do we use apostrophes?


Ownership
  1. Add an 's to the end of the person who owns it
  2. If the word ends in 's' just add an apostrophe to the end
The nachos belong to Ramon = Ramon's nachos
The fish belong to the dinosaurs = the dinosaurs' fish

Contractions
  1.  Push the two words together.
  2. Substitute the apostrophe for the missing sound.

is + not = isn't
can + not = can't
she + will = she'll
they + would = they'd
I + am = I'm


C: Why do we use apostrophes?

  • to show who owns something
  • to speak/write faster


Text Structures


D: What are text structures?


Text structures are patterns authors use to organize information.


P: How do I find text structure?

  1. Read the text well
  2. Check your understanding.
  3. Tell the main idea.
  4. Ask yourself, "How is the information presented?"
  5. Look for signal words.


C: Why do we use text structures?


Knowing text structures helps us remember better, read it faster, and make better predictions.

Sunday, October 18, 2015

Unit 2: Exploration & Colonization Part II

This project idea isn't my idea, so I've got to give credit where credit is due. I got the idea from this blogger after stumbling onto her stuff via Pinterest.


I don't know what her demographics are or what her kids' levels look like, but I wanted to scaffold my students' work a little more in order for them to have success on this project. 

First, I made a bad example and a good example of the project. I had them pass them around and talk in groups about what a good project looks like and what the bad project looked like and how to fix it.


Also, rather than have them Google information, we used this website:


I also gave them a similar research sheet, but I wanted them to practice citing their sources, so I gave them a column for sources, although mostly their information all came from the same website. 

The students' learned about and presented information on their colonies and it stuck well enough that I had one confide to me he knew the answers on a district test four weeks later because he had found out that information while researching his colony. 

Next year, I intend to repeat the project, but I will tweak it to encourage the kids to take the map parts home and include more color. They look great, but I think the originals from Room 6's are a little more aesthetically pleasing.

Even so, for a first six weeks project that included research before the scope and sequence calls for teaching the research process, it turned out great.


Social Studies & Reading Integration


Since nonfiction passages have the highest Lexile levels on the STAAR test, my grade level set a goal to work more on nonfiction throughout the year to help raise students' ability to comprehend nonfiction and to integrate more Science into the Reading classroom.

During the first six weeks, I took pieces of Teacher Created Materials digital books on the 13 Colonies and broke it up into small chunks. I then paired the students off and had them read through their chunk and break it down. 

To build their comprehension, we practiced Repeated (Close) Reading:

  1. Read the section for yourself silently
  2. Read it again with your partner and talk about it
  3. Read it a third time and work on the Figure 19 skill assigned
  4. Read it a fourth time and break out the main idea for each paragraph
The students did this in pairs and made posters on large sheets and then presented/taught their information to the rest of the class. This is a very time-costly process, but the deep reading really produces growth.


Social Studies & Fluency


We also built reading fluency by performing two plays about the colonists. 

We used this book:


I looked it up on Amazon and only two people have bothered to review, and one of them was scathing and rather hateful. So to be fair, if you go looking for this book, it says it's easy to read and it it is definitely that. If you teach in a school with students on fifth grade level, you may find the readability far below what you're looking for. However, if you work with ESL, bilingual, or struggling readers, these plays can be very empowering. Know your students. Mine ate it up! We hosted multiple performances throughout the day. Talk about reading with purpose. Performance is a great purpose for reading!


Thursday, October 1, 2015

Point of View: Limited vs. Omniscient


D: What is point of view?


  • Point of view is who is telling the story.

P: How do I find point of view?

  1. Ask, "Who is telling the story?"
  2. Classify as:
First Person: The narrator is a character in the story. 

Third Person Limited: The narrator is inside the head of only one character.

Third Person Omniscient: The narrator is outside the story and knows everything.


C: When/why do I find point of view?

  • Point of view affects the mood of the story. A different narrator makes the story feel different.